Want to automatically hide the taskbar in Windows 11 and free up some extra screen space? 💻 Windows 11 includes a built-in setting that lets you make your taskbar disappear when you’re not using it and automatically reappear whenever you need it.
In this quick tutorial, I’ll show you how to auto hide the taskbar in Windows 11 without downloading any additional software.
🎥 Watch the Video Tutorial
Follow along with my step-by-step YouTube tutorial to see exactly how to automatically hide your Windows 11 taskbar.
▶️ https://youtu.be/HNIDTqoIMCo
⚙️ How to Automatically Hide the Taskbar in Windows 11
Step 1: Open Taskbar Settings
From your Windows 11 desktop, find an empty area of the taskbar at the bottom of your screen. Right-click the taskbar and select Taskbar settings.
Step 2: Expand Taskbar Behaviors
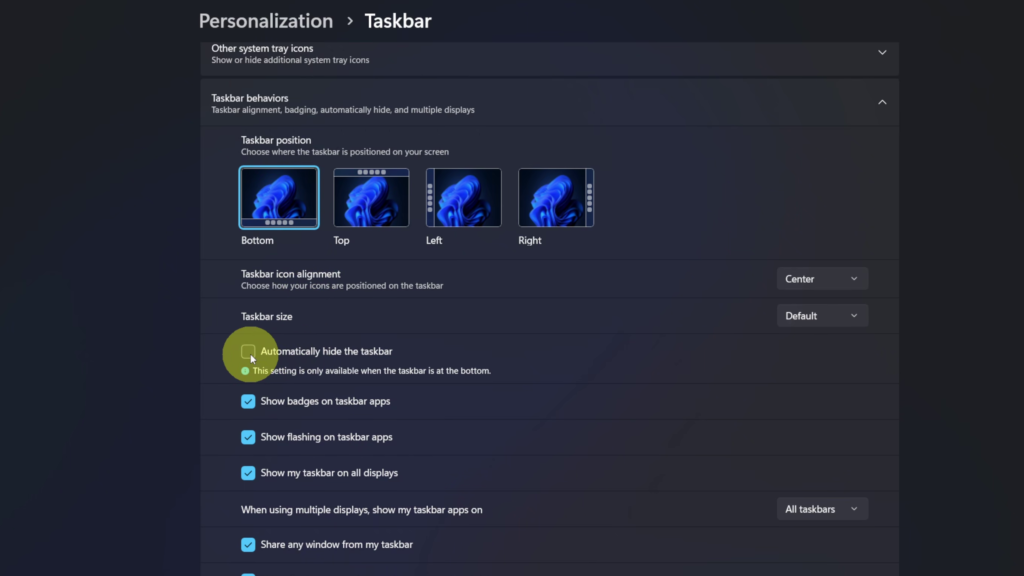
In the Taskbar settings window, scroll down until you find Taskbar behaviors. Click the arrow to expand this section if it isn’t already open.
Step 3: Enable Automatically Hide the Taskbar
Find the option labeled Automatically hide the taskbar and click the checkbox to enable it.
In the version of Windows 11 demonstrated in this tutorial, the taskbar must be positioned at the bottom of the screen for this option to work.
Step 4: Bring Your Taskbar Back
Once enabled, your taskbar will disappear when you’re not using it. To bring it back, simply move your mouse cursor to the bottom edge of your screen.
When you move your cursor away, the taskbar will automatically hide again.
💡 How to Turn Off Auto Hide in Windows 11
If you decide you want your taskbar visible all the time, return to Taskbar settings > Taskbar behaviors and uncheck Automatically hide the taskbar.
Your taskbar will return to its normal, always-visible position.
✅ Final Thoughts
Automatically hiding the taskbar in Windows 11 is a simple way to keep your desktop looking clean while making more room for your open windows. You can easily enable or disable this setting whenever you like.