Is your Windows 11 taskbar taking up too much space at the bottom of your screen? 💻 If you’d prefer a smaller taskbar with more room for your applications, Windows 11 includes a setting that lets you change its size in just a few clicks.
In this quick tutorial, I’ll show you how to make the taskbar smaller in Windows 11 using the built-in Taskbar Size setting. No additional software is needed!
⚙️ How to Make the Taskbar Smaller in Windows 11
Step 1: Open Taskbar Settings
From your Windows 11 desktop, find an empty area of the taskbar where there are no icons. Right-click the taskbar and select Taskbar settings.
Step 2: Open Taskbar Behaviors
Once the Taskbar settings window opens, scroll down until you find Taskbar behaviors. Click to expand this section if it isn’t already open.
Step 3: Change the Taskbar Size
Under Taskbar behaviors, locate Taskbar size. Click the dropdown menu and select Small instead of Default.
Your Windows 11 taskbar will immediately shrink, giving you a cleaner desktop and a little more screen space.
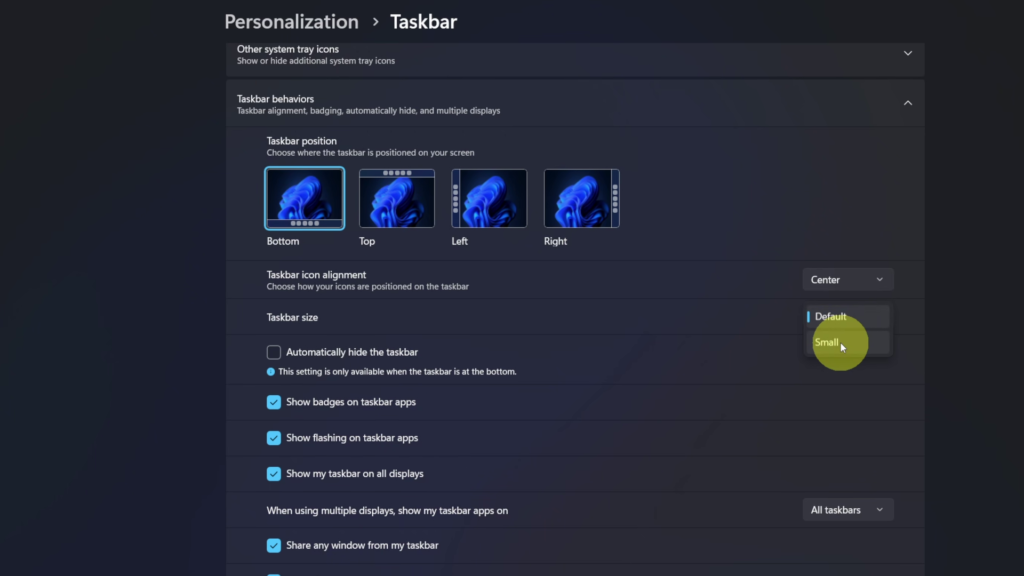
If you decide you prefer the original taskbar size, simply follow the same steps and select Default.
🎥 Watch the Video Tutorial
Want to see the entire process? Watch my quick step-by-step YouTube tutorial below.
✅ Final Thoughts
Making the taskbar smaller in Windows 11 is a simple way to customize your desktop and free up some additional screen space. Whether you prefer the default size or a smaller taskbar, you can easily switch between the two whenever you like.