Want to add smooth, professional-looking camera movement to your videos or photos? DaVinci Resolve’s Dynamic Zoom feature makes it easy to create gradual zoom effects without manually setting keyframes.
In this tutorial, I’ll show you how to enable Dynamic Zoom, choose the zoom style, and adjust exactly where your zoom begins and ends. Whether you’re editing video clips or still photos, this feature is a quick and easy way to add polished movement to your projects.
What You Will Learn
- 🎬 How to enable Dynamic Zoom in DaVinci Resolve
- 🎥 How to apply Dynamic Zoom to video clips and photos
- ⚙️ How to choose between Linear, Ease In, Ease Out, and Ease In & Ease Out
- 📍 How to adjust the zoom start and end positions
- 🔄 How to reverse the zoom direction using Swap
Step-by-Step Instructions
Step 1: Select the video clip or photo in your timeline that you want to apply Dynamic Zoom to.
Step 2: Open the Inspector and make sure the Video tab is selected.
Step 3: Turn on Dynamic Zoom using the toggle switch.
Step 4: Click in the gray area beside the Dynamic Zoom setting to open the additional Dynamic Zoom options.
Step 5: Choose your preferred zoom style, including Linear, Ease In, Ease Out, or Ease In & Ease Out.
Step 6: Change the viewer overlay from Transform to Dynamic Zoom so you can see the green and red framing boxes.
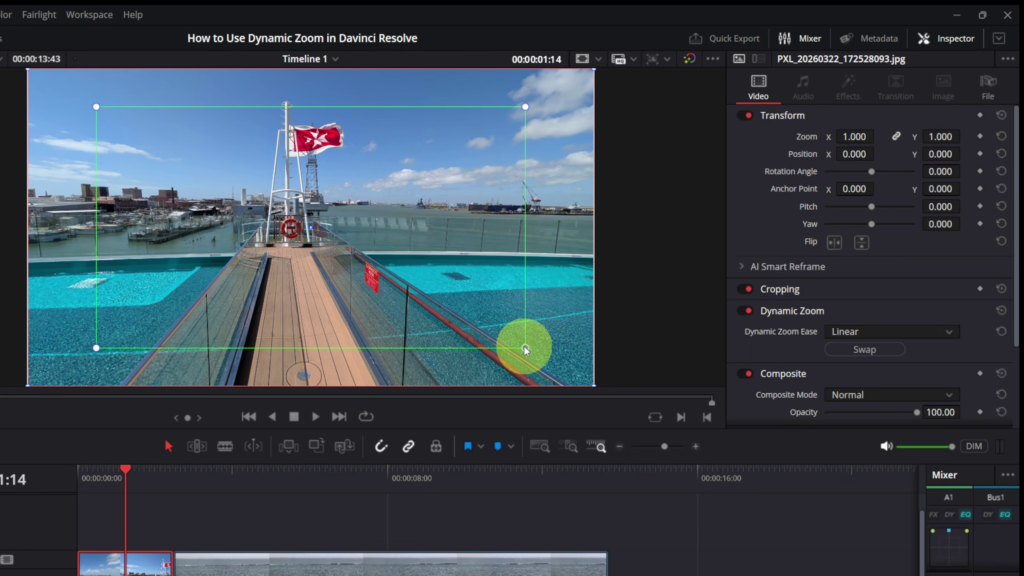
Step 7: Adjust the green and red boxes to choose where the zoom begins and ends. If you want to reverse the zoom direction, select Swap.
Step 8: Preview your clip and make any final adjustments until you’re happy with the zoom effect.
You can use the same process on both video clips and still photos to create smooth, professional-looking motion throughout your projects.
▶️ Watch the full tutorial here:
https://youtu.be/WcSpfiloTng
Related Tutorials
🔹 How to Change Playback Resolution in DaVinci Resolve
https://northernvikingeveryday.com/change-playback-resolution-davinci-resolve/
🔹 How to Record a Voiceover in DaVinci Resolve 20
https://northernvikingeveryday.com/record-voiceover-davinci-resolve-20/
🔹 How to Normalize Audio in DaVinci Resolve for YouTube
https://northernvikingeveryday.com/normalize-audio-davinci-resolve-youtube/